Länk till vår Blocket butik
WEB shop www.blocket.se/go-trading-
*
Hjulmutterguide
*
Prova fälgar på din bil
Fälgguide www.rimsntires.com/
Se vilken storlek som passar din bil. Lägg in din årsmodell & märke. Gå sedan till "Size Comparer" längst ner på vänster sida. Till vänster visar vad som är original på din bil, och till höger kan du lägga in däck & fälg storlek, samt välja olika backspace/ET. Du ser då vad totalhöjden blir jämfört med original om du ändrar däck & fälg. Skrolla sedan ner för att se hur mycket närmare däcket & fälgen kommer mot skärmkanten respektive bromsarna, du ser även hur mycket fortare/saktare hastighetsmätaren går
*
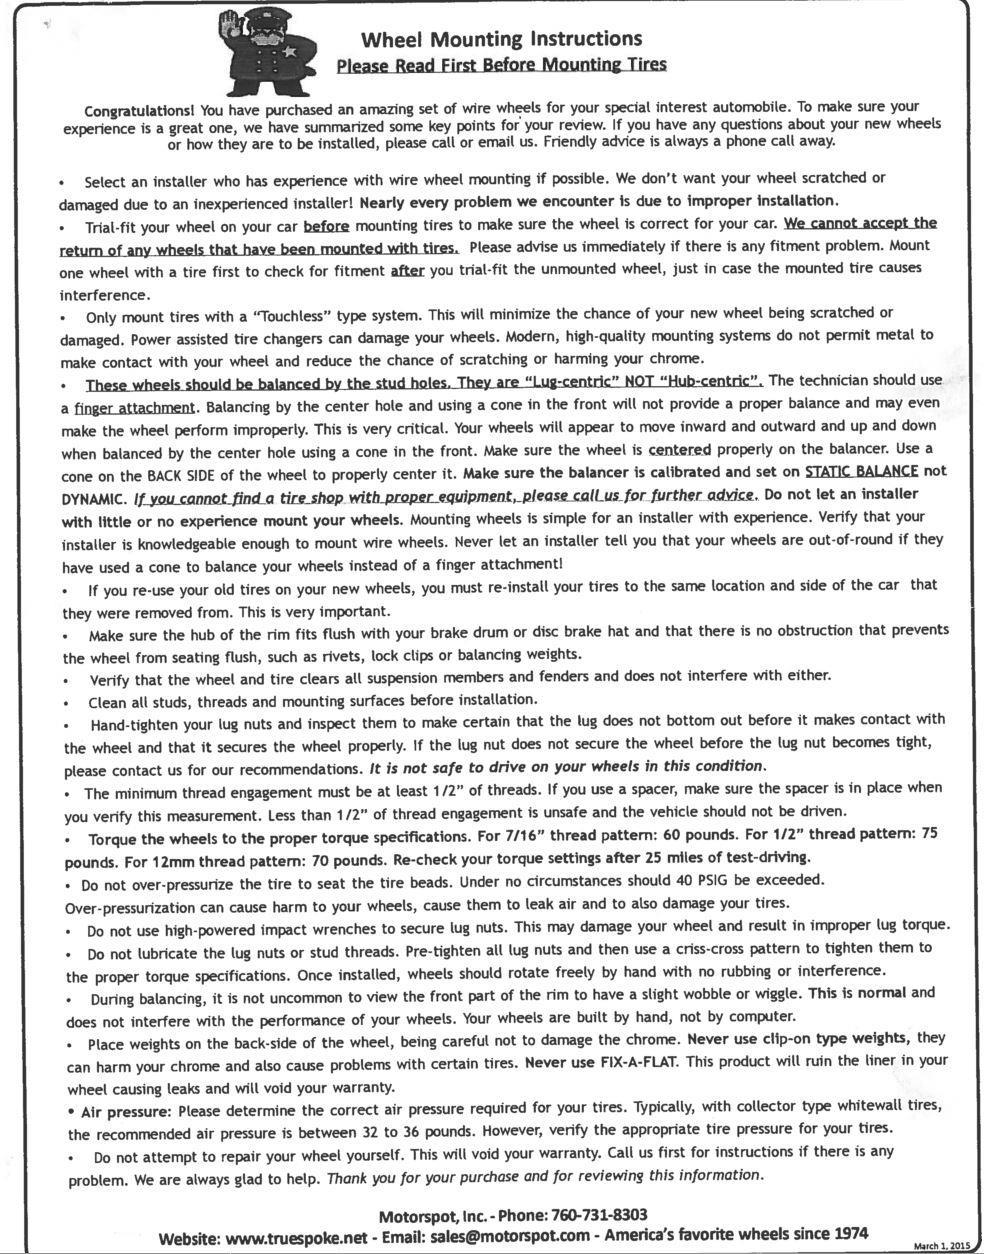
| ET/Inpressning | |
|
Fälgens ET mått / offset inpressningsdjup. |
|
*
Mätning av Backspace
Backspace mäts från fälgens anläggningsyta till fälgens bakre ytterkant.
t.e.x. om fälgen är 15x7 tum så lägger man på 1 tum för att få fälgens totala breddmått. Fälgens totala yttermått är då 8 tum bred. Sedan mäter man från anläggningsytan till fälgens bakre ytterkant & om det är 4 tum så är det 4,00" backspace. Fälgens centrum ligger i mitten eftersom det även är 4 tum från anläggningsytan till fälgens yttre framkant. Detta är samma sak som ET 0
Om det istället är 4,50" backspace på en 15x7 fälg så har man flyttat fälgens anläggningsyta 0,5tum (12mm) utåt. Fälgen breddar då mer inåt och det är samma som ET 12.
*
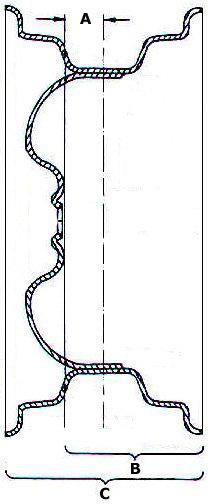
| Bultcirkeln |
| Mätning av bulticirkelns diameter på en femhålsfälg. Mät hela bulthålets diameter = A Mät från bulthålets kant till navhålets kant = B Multiplicera B-måtted med 2. Mät navhålets diameter = C Bultcirkelns diameter = A + Bx2 +C På en fyrbultsfälg mäter du från bulthålets ytterkant till bulthålets innerkant tvärs över navhålet. |
*
Bultskallar

I tabellen nedan kan du mäta bilens bult cirkel eller PCD (pitch circle diameter) i diameter. Titta i tabellen för att se din bils axel och ET-tal
4-håls fälg
| A) Indelning. Biltcirkelns diameter | B) Måttet mellanbredvidliggande bultshål |
|---|---|
| 98,0 mm | 69,3 mm |
| 100,0 mm | 70,7 mm |
| 108,0 mm | 76,4 mm |
| 110,0 mm | 77,8 mm |
| 114,3 mm | 80,8 mm |
5-håls fälg
| A) Indelning. Biltcirkelns diameter | B) Måttet mellanbredvidliggande bultshål |
|---|---|
| 98,0 mm | 57,6 mm |
| 100,0 mm | 58,8 mm |
| 108,0 mm | 63,5 mm |
| 110,0 mm | 64,4 mm |
| 112,0 mm | 65,8 mm |
| 114,3 mm | 67,2 mm |
| 120,0 mm | 70,5 mm |
| 127,0 mm | 74,0 mm |
6 - och 8- håls fälgar ändras på samma sätt som 4-hålsfälg.
*
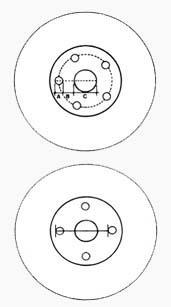
Tum till millimeter - omvandlingstabell
| Tum | Millimeter |
|---|---|
| 4 x 3.93 | 4 x 100 |
| 4 x 4.25 | 4 x 107.95 |
| 4 x 4.33 | 4 x 110 |
| 4 x 4.50 | 4 x 114.3 |
| 4 x 5.12 | 4 x 130 |
| 4 x 5.5 | 4 x 139.7 |
| 4 x 6.5 | 4 x 165.15 |
| 5 x 4.00 | 5 x 100 |
| 5 x 4.25 | 5 x 107.95 |
| 5 x 4.50 | 5 x 114.3 |
| 5 x 4.53 | 5 x 115 |
| 5 x 4.72 | 5 x 120 |
| 5 x 4.75 | 5 x 120.65 |
| 5 x 5 | 5 x 127 |
| 5 x 5.12 | 5 x 130 |
| 5 x 5.5 | 5 x 139.7 |
| 5 x 6 | 5 x 152.4 |
| 5 x 6.5 | 5 x 165.15 |
| 6 x 4.5 | 6 x 114.3 |
| 6 x 5 | 6 x 127 |
| 6 x 5.5 | 6 x 139.7 |
| 6 x 6 | 6 x 152.4 |
| 6 x 6.5 | 6 x 165.15 |
Hur du mäter fälgmått på bil
.
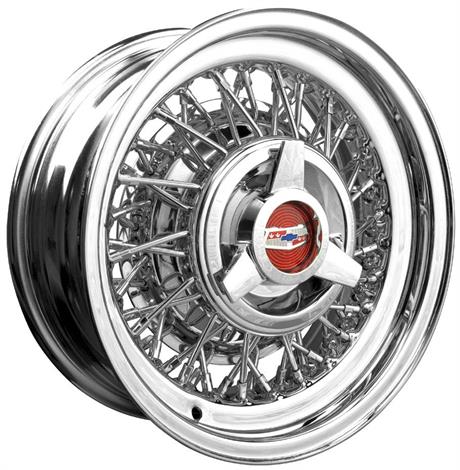
Balansering instruktioner av Ekerfälgar från Truspoke
Wheel Mounting Instructions Truspoke
Please Read First Before Mounting Tires
• Select an installer who has experience with wire wheel mounting if possible. We don’t want your wheel scratched or damaged due to an inexperienced installer! Nearly every problem we encounter is due to improper installation.
• Trial-fit your wheel on your car before mounting tires to make sure the wheel is correct for your car. We cannot accept the return of any wheels that have been mounted with tires. Please advise us immediately if there is any fitment problem. Mount one wheel with a tire first to check for fitment after you trial-fit the unmounted wheel, just in case the mounted tire causes interference.
• Only mount tires with a “Touchless” type system. This will minimize the chance of your new wheel being scratched or damaged. Power assisted tire changers can damage your wheels. Modern, high-quality mounting systems do not permit metal to make contact with your wheel and reduce the chance of scratching or harming your chrome.
• These wheels should be balanced by the stud holes. They are “Lug-centric” NOT “Hub-centric”. The technician should use a finger attachment. Balancing by the center hole and using a cone in the front will not provide a proper balance and may even make the wheel perform improperly.
This is very critical. Your wheels will appear to move inward and outward and up and down when balanced by the center hole using a cone in the front. Make sure the wheel is centered properly on the balancer.
Use a cone on the BACK SIDE of the wheel to properly center it. Make sure the balancer is calibrated and set on STATIC BALANCE not DYNAMIC. If you cannot find a tire shop with proper equipment, please call us for further advice. Do not let an installer with little or no experience mount your wheels. Mounting wheels is simple for an installer with experience. Verify that your installer is knowledgeable enough to mount wire wheels. Never let an installer tell you that your wheels are out-of-round if they have used a cone to balance your wheels instead of a finger attachment!
• If you re-use your old tires on your new wheels, you must re-install your tires to the same location and side of the car that they were removed from. This is very important.
• Make sure the hub of the rim fits flush with your brake drum or disc brake hat and that there is no obstruction that prevents the wheel from seating flush, such as rivets, lock clips or balancing weights.
• Verify that the wheel and tire clears all suspension members and fenders and does not interfere with either.
• Clean all studs, threads and mounting surfaces before installation.
• Hand-tighten your lug nuts and inspect them to make certain that the lug does not bottom out before it makes contact with the wheel and that it secures the wheel properly. If the lug nut does not secure the wheel before the lug nut becomes tight, please contact us for our recommendations. It is not safe to drive on your wheels in this condition.
• The minimum thread engagement must be at least 1/2” of threads. If you use a spacer, make sure the spacer is in place when you verify this measurement. Less than 1/2” of thread engagement is unsafe and the vehicle should not be driven.
• Torque the wheels to the proper torque specifications. For 7/16” thread pattern: 60 pounds. For 1/2” thread pattern: 75 pounds. For 12mm thread pattern: 70 pounds. Re-check your torque settings after 25 miles of test-driving.
• Do not over-pressurize the tire to seat the tire beads. Under no circumstances should 40 PSIG be exceeded. Over-pressurization can cause harm to your wheels, cause them to leak air and to also damage your tires.
• Do not use high-powered impact wrenches to secure lug nuts. This may damage your wheel and result in improper lug torque.
• Do not lubricate the lug nuts or stud threads. Pre-tighten all lug nuts and then use a criss-cross pattern to tighten them to the proper torque specifications. Once installed, wheels should rotate freely by hand with no rubbing or interference.
• During balancing, it is not uncommon to view the front part of the rim to have a slight wobble or wiggle. This is normal and does not interfere with the performance of your wheels. Your wheels are built by hand, not by computer.
• Place weights on the back-side of the wheel, being careful not to damage the chrome. Never use clip-on type weights, they can harm your chrome and also cause problems with certain tires. Never use FIX-A-FLAT. This product will ruin the liner in your wheel causing leaks and will void your warranty.
• Air pressure: Please determine the correct air pressure required for your tires. Typically, with collector type whitewall tires, the recommended air pressure is between 32 to 36 pounds. However, verify the appropriate tire pressure for your tires.
• Do not attempt to repair your wheel yourself. This will void your warranty. Call us first for instructions if there is any problem. We are always glad to help. Thank you for your purchase and for reviewing this information.
Motorspot, Inc. - Phone: 760-731-8303
Website: www.truespoke.net - Email: sales@motorspot.com - America’s favorite wheels since 1974
March 1, 2015
*